Monthly Archives: April 2014

CSS absolute positioning prevents jquery ui droppable (sorta)

This is a case of too much drinking while coding for sure.

Working Example
I was trying to implement jquery UI draggables/droppables using the example here.
I made a couple of minor changes to the file to illustrate a point.

  1. I removed the class “ui-widget-header” from the “droppable” div because I wanted to make it a transparent box.
  2. I added “border-style: solid; border-color: red” to droppable so you could still see the box boundaries.

So you can see the results of my edit here in the starting positions of the draggable and droppable.

Image

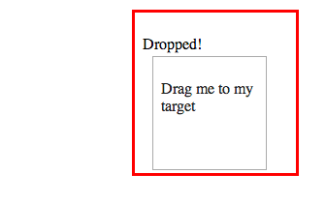
Next, I moved the draggable box into the droppable box like so:

Image

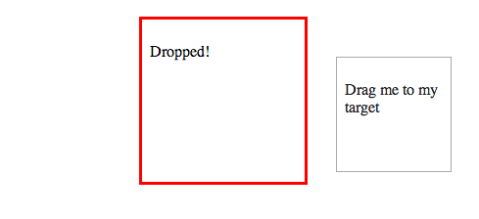
So far so good. Finally, I drag the draggable outside of the droppable.

Image


Alright, looks good to me.

Absolute Positioning F*’s things up (sorta)

Now, I make a minor change to the droppable css again adding “position: absolute; left: 200px”.
“Position: absolute” positions it to an absolute position (duh). “left: 200px” just moves it away from the draggable, otherwise, it would show up right on top of it.

So again, let’s refresh our page and try again from the beginning here:

Image

Then we drag the draggable into the droppable like so

Image

Not bad.

And now let’s drag it out of the… damn it!

You can’t!

So absolute:positioning breaks draggables, right? Better report the bug, right?

Nope. Let’s put the “ui-widget-header” back on “droppable” removing its transparency so we can see what’s going on.

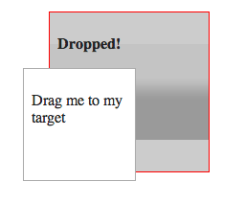
First, let’s remove “position:absolute” from the droppable’s css. And this time, we’re going to drag the draggable just slightly into the droppable, not all the way. It’ll look something like this.

Image

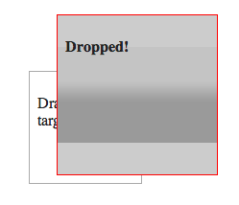
Now, let’s add back “position: absolute” to the droppable’s css, and do the same thing.

Image

Do you see what happened there?

When absolute:positioning is on, the draggable rests underneath the droppable. And because of that, you can’t grab it to drag it out of the droppable.

So we’ve confirmed it: it’s broken, right?

Not so fast.

The Solution

There’s this rarely used css attribute called z-index. This property specifies the layering order of stacked elements. (You didn’t know flat objects on a webpage had depth, did you?)

So we can set the z-index of the droppable to a negative number like -1, to bring the droppable behind the draggable. Or we can set the z-index of the draggable to a higher positive number like 10, to bring the draggable in front of the droppable.


Tagged , , , , ,

OOP Inheritance in javascript

(Depends who you ask but) Javascript doesn’t natively support inheritance. It can be implemented to support object-oriented programming and encapsulation pretty easily, but inheritance is not offered automatically.

There are many patterns on the web on how write javascript to provide inheritance. Here’s the simplest (perhaps most common (and incorrect)) one:

function Animal(numLegs) {
  console.log("Animal instantiated");
  this.numLegs = numLegs;
}
// define animal-specific variables and methods
Animal.prototype...

function Dog() {
  console.log("Dog instantiated") {
}
Dog.prototype = new Animal();
Dog.prototype.constructor = Dog;

// define dog-specific variables and methods
Dog.prototype...

var dog = new Dog();

While this works on very simple cases, it doesn’t work well for passing constructor params. In fact, Animal’s numLegs variable will always be undefined.

Other patterns for supporting inheritance can be found in these posts:
http://stackoverflow.com/questions/1645027/popular-javascript-inheritance-patterns
http://stackoverflow.com/questions/1595611/how-to-properly-create-a-custom-object-in-javascript#1598077

I haven’t personally tried all the above patterns, but they seem messy at best.

The best, simplest, and of course correct pattern, I’ve found is from here.

You can read the details of why it works from the blog, but here is a quick primer:

// put this helper method somewhere
function inheritPrototype(childObject, parentObject) {
  var copyOfParent = Object.create(parentObject.prototype);
  copyOfParent.constructor = childObject;
  childObject.prototype = copyOfParent;
}

function Animal(numLegs) {
  this.numLegs = numLegs;
}

function Dog(numLegs, furColor) {
  this.furColor = furColor;
  Animal.call(this, numLegs);
}

inheritPrototype(Dog, Animal);

var dog = new Dog(4, 'brown');

Simple and correct.

Tagged , ,

What unix commands do you use most?

Type this command into your terminal

history | awk '{h[$2]++}END{for(i in h){print h[i],i|"sort -rn|head -20"}}' |awk '!max{max=$1;}{r="";i=s=60*$1/max;while(i-->0)r=r"#";printf "%15s %5d %s %s",$2,$1,r,"\n";}'

My result looks like this:

            git   158 ############################################################ 
        vagrant   157 ############################################################ 
           exit    33 ############# 
             ls    31 ############ 
             cd    25 ########## 
          mongo    16 ####### 
            ssh    14 ###### 
    tomcat_stop    12 ##### 
   tomcat_start    10 #### 
            pwd     7 ### 
        mongodb     6 ### 
             wc     4 ## 
           node     4 ## 
            awk     4 ## 
             vi     3 ## 
         locate     3 ## 
           less     3 ## 
           open     2 # 
          touch     1 # 
           sudo     1 # 

Looks like git and vagrant are my two most command utilities recently.

What’s yours?

jQuery Mobile events

Some references for jQuery Mobile events.

Here’s a list of events from jQueryMobile 1.2.1

Here’s a great diagram to show the lifecycle of events:

[source]


Update: A fellow coder has an excellent and very thorough set of sequence diagrams for events (in jQM 1.4). Please check it out here

jQuery Mobile “Page” Events – What, Why, Where, When & How?

jQuery: Attaching event handlers to non-existent elements

Prior to jQuery 1.7, there was a live() method which could be used to attach event handlers to non-existent elements.

Suppose you have an empty div, which you dynamically create links in later.

<div id="newLinks">
</div>

...
$('#newLinks').html("<a href='next.html'>click me</a>");

When the DOM first loads, there are no anchor tags so if you tried to bind an event handler to it, it will fail.

$('a').bind("click", function() {
  alert("clicked");
});

The above alert will never fire because the bind may be invoked before the anchor is added.

This was dealt with using the live() method which binds to elements that exist now or will exist later.

$('a').live("click", function() {
  alert("clicked");
});

However, as if jQuery 1.7, the live() method is deprecated, and even the use of bind() is discouraged. Instead, the on() method is preferred.

This is the preferred way to bind to an existing or yet-to-exist element.

$('#newLinks').on("click", 'a', function() {
  alert("clicked");
});

The above code will limit the method to look for anchor tags within the #newLinks div. This will be more performant than binding to all anchors on the page, unless that is the intent.

Ubuntu/Debian’s apt-get commands

This is a useful list of commands for managing packages on Ubuntu or Debian.

This will show you what versions of a package are available for your system.

apt-cache showpkg <package>

This will install the latest version of the package.

apt-get install <package>

This will install a specific version of the package. The version can be obtained from the apt-cache command above.

apt-get install <package>=<version>

This will show you what version you have installed.

apt-show-versions <package>

This will remove the package.

apt-get --purge remove <package>
Tagged , ,

Setting up Authentication in Apache 2.4 (revisited using Vagrant)

Some time ago, I detailed in horrific detail how to build and set up Apache 2.4 in Ubuntu 12: part I and part II. It worked but it was a mess!

Now we’re going to do it using Vagrant and Puppet. I assume you buy into the Automatic Provisioning method and have some understanding of Vagrant and Puppet.

Here is the working example that I’ll be explaining in detail below. You can download it and get Mysql and Apache with authentication up and running right away.

Folder Structure

Screen Shot 2014-04-01 at 3.35.13 PM


  • manifests – holds the puppet script, site.pp, that declares what should be installed and how to set it up
  • modules – you can think of these as libraries or packages that others have built to help you set up your system. They were downloaded from Puppet Forge
  • resources – this is where I keep various files that I copy into the VM to help with the set up. In this case, the index.php and login.html file are just files that help me test the apache authentication component
  • scripts – I use largely .pp puppet scripts for provisioning, but there are some things that are easier for me in unix scripts, so I place those files here
  • Vagrantfile – this is the vagrant file that commands the building and provisioning of the VM

Vagrantfile

Let’s talk first about the Vagrantfile. You can read more about the options at Vagrant.


config.vm.box = "parallels/ubuntu-13.10"

This line indicates which box we’re starting with. I found it with a search for “ubuntu puppet” on VagrantCloud. I specifically wanted an Ubuntu 13 box with Puppet installed. The reason is because apache 2.4 isn’t part of the package distro until ubuntu 13. You may want to look for a Ubuntu 14 box when it’s ready since that will be a LTS version.

config.vm.provision "shell", path: "scripts/provision.sh"

This line instructs Vagrant to call the unix script, provision.sh. This script just makes sure that the latest puppet is installed and that certain libraries for apache/php/mysql are installed as well.

  config.vm.provision "puppet" do |puppet|
    puppet.manifests_path = "manifests"
    puppet.manifest_file  = "site.pp"
    puppet.module_path = "modules"
  end

These next set of lines is where the action is at. This instructs Vagrant to use the site.pp puppet script to provision the rest of the system. It also tells it where the modules are located.

site.pp
This file represents the puppet provisioning script. Again, I’ll refer the reader to Puppet for more details, but I’ll describe the specifics of this install.

class { '::mysql::server':
  root_password => $pass2,
  users => {
    'root@%' => {
      ensure => 'present',
      password_hash => $pass2mysql5hash
    }
  },
  databases => {
    'myDB' => {
      ensure => 'present',
      charset => 'utf8'
    }
  },
  grants => {
    'root@%/*.*' => {
      ensure => 'present',
      options => ['GRANT'],
      privileges => ['ALL'],
      table => '*.*',
      user => 'root@%'
    }
  },
  override_options => {
    'mysqld' => {
      'bind-address' => undef, # allow remote login
    }
  },
  restart => true,
}
include '::mysql::server'

As you can imagine, this section sets up Mysql.
The users sub-section creates a root user with a password. It requires a password hash which you can generate here.
The databases sub-section creates a database called “myDB”.
The grants sub-section ensures that when root logs in from anywhere, it has access to all the databases and tables.
The override_options sub-section overwrites the “bind-address” parameter to allow remote login of root.

Now let’s dissect the apache setup section.

apache::vhost { 'http':
  port => '80',
  docroot => '/var/www',
  custom_fragment => '
    DBDriver mysql
    DBDParams "dbname=myDB,user=root,pass=XXX"
    DBDMin  4
    DBDKeep 8
    DBDMax  20
    DBDExptime 300
    <Location /private>
      AuthFormProvider dbd
      AuthType form
      AuthName private
      Session On
      SessionCookieName session path=/
      #SessionCryptoPassphrase secret
      ErrorDocument 401 /login.html
      # mod_authz_core configuration
      Require valid-user
      # mod_authn_dbd SQL query to authenticate a user
      AuthDBDUserPWQuery "SELECT password FROM user WHERE username = %s"
    </Location>'
}

If you remember from the previous post, we had to set up the httpd.conf to do authentication. You can refer back to that post to see what which line means.

As it relates to puppet, this declaration sets up a virtual host on port 80, with a docroot pointing to ‘/var/www’ (this is where you should put your webpages), and a custom_fragment to set up authentication.

include apache::mod::prefork
include apache::mod::php
apache::mod { 'authn_core': }
apache::mod { 'auth_form': }
apache::mod { 'session': }
apache::mod { 'request': }
apache::mod { 'session_cookie': }
apache::mod { 'authn_dbd': }
apache::mod { 'dbd': }

The above modules also need to be configured for authentication to work. (It also includes php just because you’ll probably need that too.)

class apache_links {
  $apachehome = '/home/vagrant/apache'
  file { 'apachehome':
    path => $apachehome,
    ensure => directory,
    require => Class['apache']
  }

  file { '/home/vagrant/apache/htdocs':
    ensure => 'link',
    target => '/var/www',
    require => File['apachehome']
  }

  file { '/home/vagrant/apache/conf':
    ensure => 'link',
    target => '/etc/apache2',
    require => File['apachehome']
  }
}
include apache_links

This section just sets up some symlinks. I often forget where the configuration and webpages are located so I like to place them right at the home directory.

class apache_auth_test {
  file { '/home/vagrant/apache/htdocs/login.html':
    source => "/vagrant/resources/login.html",
    require => Class['apache_links']
  }

  file { 'apache_test_dir':
    path => '/home/vagrant/apache/htdocs/private',
    ensure => directory,
    require => Class['apache_links']
  }

  file { '/home/vagrant/apache/htdocs/private/index.php':
    source => "/vagrant/resources/index.php",
    require => File['apache_test_dir']
  }
}
include apache_auth_test

This final section just copies the test files from the resources folder into the VM so we can test it.

Start it Up

Now that the hard part is done, you just need to start it up. From the folder where the Vagrantfile is, just type

vagrant up

This will download the “parallels/ubuntu-13.10” box we indicated in Vagrantfile (if it hasn’t been downloaded already). Then it will run the privision.sh script, followed by the site.pp puppet script. After a few minutes, you’ll have an Ubuntu server with mysql and apache installed!

Test it

First, try to ssh into the box. From the folder where the Vagrantfile is, just type

vagrant ssh

You should now be inside the VM. You can type “ifconfig” to get the IP of the box.

With this, try pointing your host machine’s browser to that IP (e.g http://192.168.1.100). You should get the standard apache message “It works!”

Before we test authentication, you’ll need to create a mysql table to authenticate against. So connect to the mysql (either remotely or locally) and in the myDB database, create a table with this sql statement:

CREATE TABLE `user` (
 `username` varchar(255) NOT NULL DEFAULT '',
 `password` varchar(255) NOT NULL,
 PRIMARY KEY (`username`)
) ENGINE=InnoDB DEFAULT CHARSET=latin1;

Then insert a user and password hash.
For example, try entering user=admin, password={SHA}5yfRRkrhJDbomacm2lsvEdg4GyY=
This password hash is for the password “mypass” with a “{SHA}” prefix in front to tell apache authentication module which hash to use. You can generate your own hashes at this site.

Now to test authentication, point your browser to http://192.168.1.100/private/index.php.
This is a protected folder so it should redirect you to a login page (from login.html).
After you type in the correct password, it should direct you to the index.php page with a “Hello World”

I hope this was helpful. Let me know if you run into any trouble.

Tagged , , ,